Physical Address
304 North Cardinal St.
Dorchester Center, MA 02124
Physical Address
304 North Cardinal St.
Dorchester Center, MA 02124


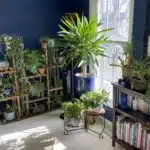
Many of us flourished in the environment with blossoming plants; nonetheless, transplanting is important on occasion to keep the plant thriving. That could be due to the soil losing nutrients or as the plant has finally expanded beyond the pot size. A transplant is done to give a rebirth to your beloved plant. But, the question arises: How to know when it is time to transfer and what things need to be done to avoid any kind of shock, thereby making the transplant a smooth transition? In this guide, we will discuss the most discussed details of repotting houseplants, as well as give you some top tips and tricks for ensuring a healthy and happy plant. Get your hands dirty with the best care and love for your plants in your house!

Several signs confirm that it is time to repot your precious houseplant:
Look out for these telltale signs and, if spotted, prepare to redress your subject, giving it a pot with room and soil with food in little space.
The signs of a plant that is due for another pot is important for the plant’s general well-being and ability to grow well. An obstruction in growth could be due to the root system failing to fit comfortably within the pot and being so visible that it shows out through the drainage holes. Another example of a failing root system is extreme circular growth along the border of the pot. Indications that the soil is crumbly or too dry, from allowing water to drain through quickly, or that the potting mix has compacted, are clues that the medium is worn out and is not providing the necessary anchorage and drainage. Other factors may include non-stop stunting or constant leaf discoloration, blanching, and just slow growth, even under a favorable outside environment. Relocating to a more spacious home or finding better soil should give further enhancement to the plant’s longevity, as well as repotting in itself.
Repotting plants is best conducted when in active growth, for most of the plants, this is in spring or early summer, in lie with their growth-ensuring that they will have enough food to recuperate and reestablish themselves in their newly acquired pot. It’s always good to avoid repotting a plant when it’s technically out of bloom or out of leaf this would only stress a plant that is quite late in the elaborate process of taking its rootstock, undoubtedly throwing off all growth processes in the plant.
To evaluate the root ball, gently take out the plant from the pot and inspect the roots. Good forward roots should be white or light-colored and firm, and should ideally be spread well through the soil. However, there will always be instances of where these are looping and binding around the edges or growing right through the drainage holes. This is the patient: the plant is root-bound and necessitates repotting. On the other hand, it will not be necessary for the plant to be transferred to a bigger pot if the roots seem few and the soil crumbles apart withing easily. Be mindful of spotting the appearance of root rot, characterized by dark, mushy roots with an unpleasant smell, as those indicate poor drainage or overwatering and hence immediate attention is required.

When selecting the best pot for the repotting process, choose a pot that is slightly larger than the current one—usually a 1-2 inch larger one in diameter. Moreover, the pot size and chosen pot must be appropriately planned (though this simply relies on the plant). Containers need drainage holes as well. Drainage holes are required to eliminate excess water. Some types of planting pots have material features such as plastic, ceramic, or terracotta. Match the pot material to the water management needs of the plant. Terracotta pots are usually porous, which means they are excellent for plants that prefer to use drier soil, while plastic pots are well known for retaining more moisture and may be great for constant watering. Always prioritize the pot’s functionality, as well as your plant’s specific, individual invigorating features.
When choosing a new pot for planting, make sure you pick one large enough for the roots to grow comfortably but not too big. A pot measured one to two inches larger in diameter than the plant’s current housing should amply suffice for smaller plants; on the other hand, larger plants may need a pot two to four inches larger. An oversized pot, in any case, tends to retain excess moisture, creating a bigger ground for root decay. Administer the growth condition of the plant, growth rate, and root system to know what size will be adequate, while making sure there is proper support and ability for drainage to facilitate healthy growth.
When deciding to choose from either a plastic or terra cotta pot, one should consider the needs of the plant as well as the environment, or climate.
| Pot Type | Characteristics | Best For |
|---|---|---|
| Plastic Pots | Lightweight, affordable, close moisture retention | Plants requiring even moisture levels or less frequent watering |
| Terra Cotta Pots | Porous material, better airflow, assists evaporation, heavier, natural design | Plants needing good drainage, large plants requiring stability |
Terra cotta, meanwhile, is a porous material that allows better airflow to assist evaporation and prevent overwatering but demands more waterings than plastic terracotta. Terra cotta pots are heavier and provide the required steadiness for big plants; moreover, their natural design will enhance the interior or exterior landscapes. However, the main choice depends totally on the needs of the plant, your watering habits, and personal tastes.
⚠ Important: It is highly crucial that plenty of water escapes from your plants because this is how root rot and waterlogged soils are avoided. Ensuring that there’s a good drainage system can allow all plants to make good use of oxygen and nutrients instead of being chewed up by wet conditions. This is very vital for almost every plant and especially the ones in containers in order to maintain the balance of moisture and give them good health for a lifetime. Make it a practice when choosing pots that they always have drainage holes or they have pot drainage holes installed on pots that have none.

The pot should be just a little larger than the current one and should come equipped with drainage holes to help avoid overwatering.
Take action with a good-quality potting mix, amend it in such a way that it suits the type of the plant you are dealing with, is capable of supplying optimum nutrients, and can improve sufficient drainage.
Providing some water will make the plant prepared for one day to make easier the removal from the current pot without much damage or stress.
Loosening the soil gently and then coaxing the plant out of its current pot while avoiding causing injury to its roots.
Trim any damaged or dead roots right away and inspect for signs of root rot or pests.
Put the plant into the new pot so that its base is right just in front and filled with fresh potting mix, tamping it around the roots ever so slightly.
When putting the plant back in its pot, water it so that it may fill up some more and get rejuvenated. Be cautious not to drown it thereafter, though!
Re-potting of a plant requires certain essentials for its smooth transition. With respect to this, a new pot should be bought (of an appropriate size). The new pot has to be a bit larger as compared to the older pot, and it should speak a drainage hole in the bottom to prevent any problem of waterlogging. Choosing the highest-quality potting soil based on the kind of plant you have is the most important consideration, as it is the source of essential nutrients. Get ready the gardening gloves, trowel, and pruning shears alongside the setup. This will ensure optimal protection to the plant during the operation. A watering can would go a long way towards catering to the plant’s immediate watering requirements, but as a precautionary measure to keep working surfaces tidy, a tarpaulin or newspaper should be put in place. Preparing your equipment in advance will help to make repotting easy and stress-free for you and for the plants.
Make sure the new pot is slightly larger than the old pot so that the plant can spread its roots but without drowning them in too much space. Also, the pot must have proper drainage. If the pot do not have openings, try putting a layer of gravel at the bottom. First, clean the pot thoroughly before planting in order to wipe out any harmful bacteria or substance. Lastly, test the pot to protect from falling when you put the plant in it and keep it safe and sound with its new abode.
To achieve good plant health and growth, your choice of soil mix is the most crucial. Select a mix that enables the plant to breathe, drains well, and holds adequate moisture for the plant to be healthy. Consider the different needs of your plant—some may thrive in a mix for cacti and succulents, while some will prefer a nutrient-rich potting soil. Use organic matter like compost or peat moss to improve the texture and nutrient content of the mix. Avoid heavy or compacted types of soils if you would like to give your plants the space they need to develop good roots and transpire water, otherwise you will allow the plants to suffer from root rot down the road. Plan the mix of the soil according to the needs of your plant and the specific environmental factors to make the best growth.
To get the plant out of the pot it is currently in, start by carefully freeing up the soil from the plant’s outer boundaries. You can use your hands, a small scoop, or a butter knife to pry the soil away from the pot interior, being very careful not to hurt the plant unnecessarily. Once tension-free, tilt the pot and hugly grasp the plant at the bottom while pulling until finally it gently slides out. Knock around the sides and bottom of the pot if the plant seems stuck or carefully squeeze on the flexible pot until it dislodges. Make sure not to yank on the stem; it might come off in your hands. For rootbound plants, poke around the root ball with your fingers and loosen them before repotting.
While treating the root ball, first check to see if it seems healthy; this would usually require a firm, white root ball. If the roots have been tightly packed or were beginning to circle the perimeter of the root ball, you should gently tease them apart by using your fingers in order to encourage new growth. Severely bound roots may require some slight trimming in small sections, so use clean, sharp scissors. Exercise caution not to cut away too many of the roots as this would stress the plant. If there are any roots that are either dark, mushy, or give off a bad smell, they are rotting, and they should be trimmed off to prevent further harm. With this step completed, the plant will now be ready to be placed carefully in its new pot or soil mixture.
Handle the plant with care while introducing it to the new container and ensure that the roots are evenly spread properly without getting squeezed in by the wall of the container. Properly adjust the plant in the container by placing it at the same depth it was at in the previous pot. Wherever the top of the root ball lands is where the rim of the new container will be; you do not wish it too far below the rim. As you introduce the new potting soil around the roots, pat down with your fingers slightly to remove air pockets. Be careful not to pack the soil too tightly; this can constrict root growth. Water thoroughly once it is properly housed to settle the soil and hydrate the plant. Make sure the pot has adequate drainage to rid itself of water or else water will collect at the bottom and rot the roots.

It is important to consistently care for the plant during this time to allow the plant to get acclimate in the new environment.
After repotting, plants will benefit from watering to maintain even soil moisture, thus preventing waterlogging and reducing stress. Begin by watering gently post-repotting to help settle the soil around roots without soaking, thus allowing the plant to adapt naturally. Observe the soil condition for the next few days, letting the top inch dry out; then two actions need to be taken: avoid instant watering post-repotting since overwatering might yield root rot and, with the plant’s good signals revealing feasible growth in its new home, gradually return to an equal water supply as of the plant’s routine.
An overabundance of soil often results in poor drainage of water, consequently causing pooling around the mother plant’s roots, leading to root rot. It is, therefore, necessary to have enough drainage holes in the pot or planting area and to use well-aerated, unfolded, and well-aerated quality potting soil. Of these two factors, the latter is not very practical; however, in cases where the productive and compacted sowing medium is too much, the bits of the mixture should be quietly loosened to improve airflow and water movement. It is not a good idea to insert excessive soil amounts into pots because that will hinder root development. If one runs into soil leftovers during repotting, rather than throwing it away, one can reuse it for another plant, add it to a compost pile, or reuse it for garden borders. Proper soil management is essential to a plant’s health.
Patch Plants – Complete Guide to Repotting
This guide covers essential steps like choosing the right pot size, removing the plant carefully, and using appropriate potting soil.
Visit Patch Plants
Swansons Nursery – How to Repot a Plant
A step-by-step guide from a trusted garden store, including tips on handling the root ball and watering after repotting.
Visit Swansons Nursery
The Green Mad House – The Guide to Repotting Your Plants
This source explains when and how to repot plants, focusing on seasonal timing and signs that a plant needs repotting.
Visit The Green Mad House
Spring and early summer are considered the best time for this, as it is the growing season when the plants are actively growing and are quite capable of recovering from the stress of repotting. If you find that roots are visible out of the drainage holes or entwining around the pot, then the time for repotting may have arrived. Equally, if the leaves turn light green or have dry edges, or if any of the plant parts are exhibiting yellowing or brown tips with necrotic margins, this may be considered to signal nutrient deficiency. Repotting often works wonders for such plants. As always, fresh potting mix must be provided.
When a plant needs repotting, there are many different possible signs that could suggest it. Commonly, this includes being root-bound, which is when roots are escaping through drainage holes or wrapping themselves around the pot on the inside. On the other hand, a sign that the plant is due for repotting is a plant growing top-heavy or leaning off to one side, which could suggest that the plant has already far outgrown its present container. If you see stunted growth in your plant, or if its leaves are turning yellow, it is indicative of nutrient starvation, demanding that the plant be removed and repotted. Furthermore, the plant might need a new pot if this is true and water drains slowly and fails to absorb well, floating on the soil all around the roots.
The type of soil for repotting would depend largely on the requirements of the plant itself. While most houseplants do best in well-draining potting mixes that are able to retain moisture without becoming oversaturated, succulents and cacti with some additional sand or perlite can easily rid themselves of excess moisture. Tropical plants, however, may respond well to soil mixes with organic matter such as peat moss to retain moisture to some extent. Hence, research your individual plant’s specifications and move forward with the perfect mix.
Generally, repotting is preferable to be carried out within the dormant period of the flowers, although it can still be done while a plant is in bloom. When a plant is root-bound or its soil is poor, repotting is helpful to preserve its health and vigor. However, extreme caution should be in to prevent damage to the roots, especially at the time of replanting during the flowering phase. Ideally, allow the plant to bloom and thereafter repot the plant. If forced to repot a plant during blooming, then do it very gently and ensure its care afterward to help it resume its vigor.
After replanting your plants, you want to make sure they are going to have the proper care, ensuring an adjustment into their new environment. Make sure that the plant has a good drenching of water to settle the roots in the soil and eliminate any air pockets. The plant should be given light in a moderate manner and must be kept away from direct sunlight to help relieve its stress for a couple of days. Keep your plant under surveillance for any signs of shock, like sagging or yellowing leaves, and therefore, warmth, while adaptation may limit action. Lastly, follow the practice of not fertilizing your plant immediately after being repotted, as enough nutrients should already be available within the new soil, at least for the first couple of weeks.